图形学笔记 -- OpenGL 图形学 / 高级 OpenGL:深度测试、面剔除、帧缓冲 等
深度测试、鼠标点击选取模型、模板测试、混合、面剔除、帧缓冲、高级数据,高级 GLSL、几何着色器、实例化、抗锯齿等。
前面的简单,看到后面,慢慢的有难度了,stencil 模板测试,要看好久才能理解。
深度测试
\[\begin{equation} F_{depth} = \frac{z - near}{far - near} \end{equation}\] \[\begin{equation} F_{depth} = \frac{1/z - 1/near}{1/far - 1/near} \end{equation}\]鼠标点击选取模型
就要把屏幕坐标一步一步还原成世界坐标。
Model ourModel("E:/kSource/LearnOpenGLz/LearnOpenGL-og/resources/objects/nanosuit/nanosuit.obj");
glfwGetCursorPos(window, &winX, &winY);
glReadPixels((int)winX, 600 - (int)winY, 1, 1, GL_DEPTH_COMPONENT, GL_FLOAT, &winZ);
float x = (2.0f*winX) / 800.0f - 1.0f;
float y = 1.0f - (2.0f*winY) / 600.0f;
float z = winZ * 2.0 - 1.0f;
float w = near * far / (near*winZ - far * winZ + far);
glm::vec4 wolrdPostion = glm::inverse(view)*glm::inverse(projection)*w*glm::vec4(x, y, z, 1);

// 遍历模型,根据距离判断哪个被选中了。
float _distance=glm::distance(_modelsIter->second.first+glm::vec3(0,7.5,0),glm::vec3(wolrdPostion));
Mouse Picking with Ray Casting
Instead of starting with a mesh in local space, we are starting with a 2d mouse cursor position in viewport space. We work backwards through the transformation by using inverse matrices, and arrive with a ray in world space.
It can be useful to click on, or "pick" a 3d object in our scene using the mouse cursor. One way of doing this is to project a 3d ray from the mouse, through the camera, into the scene, and then check if that ray intersects with any objects. This is usually called ray casting. This is an entirely mathematical exercise - we don't use any OpenGL code or draw any graphics - this means that it will apply to any 3d application the same way. The mathematical subject is usually called geometric intersection testing.
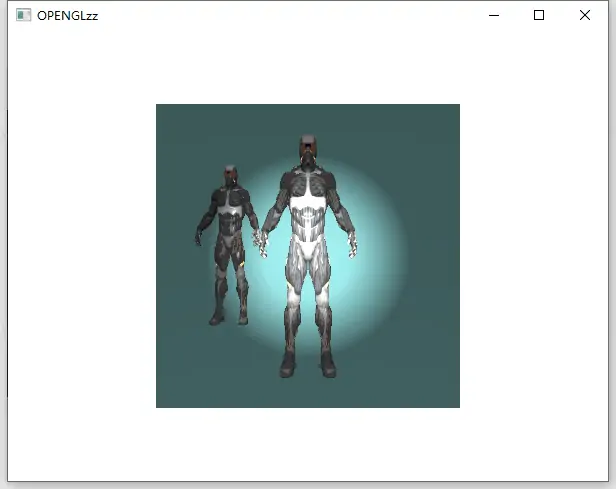
stencil 模板测试
- 启用模板缓冲的写入。
- 渲染物体,更新模板缓冲的内容。
- 禁用模板缓冲的写入。
- 渲染(其它)物体,这次根据模板缓冲的内容丢弃特定的片段。
// 开启
glEnable(GL_DEPTH_TEST);
glEnable(GL_STENCIL_TEST); // 启用蒙板测试
glStencilOp(GL_KEEP, GL_KEEP, GL_REPLACE);
while (True):
// 每次绘制。
glClear(GL_COLOR_BUFFER_BIT|GL_DEPTH_BUFFER_BIT|GL_STENCIL_BUFFER_BIT);
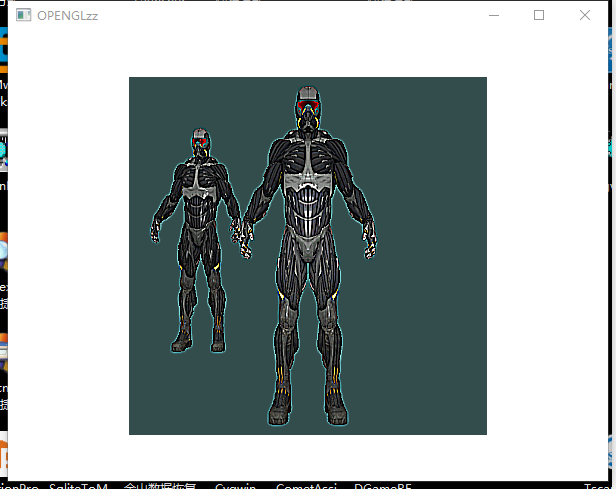
if selected: // 如果选中了。
glStencilMask(0xFF); // 设置模板缓冲为可写状态
glStencilFunc(GL_ALWAYS,1,0xFF); // 所有片段都要写入模板缓冲
model.Draw(modelShader); // 绘制模型
glStencilMask(0x00); // 禁止修改模板缓冲
glStencilFunc(GL_NOTEQUAL,1,0xFF); // 不等于 1 才写入。
float scale=1.02; // 模型放大一点
model.Draw(stencilShader); // 绘制边界,就把模型边框绘制出来的
glStencilMask(0xFF); // 设置模板缓冲为可写状态
else: // 如果没选中。
glStencilFunc(GL_ALWAYS,1,0xFF);
_modelsIter->second.second.Draw(modelShader); // 绘制模型

伪代码:
// stencil test 比较的时候需要 mask
status = glStencilFunc.func((stencilbuf[x,y] & glStencilFunc.mask), (glStencilFunc.ref & glStencilFunc.mask));
status |= depth_test_result;
if (status == stencil_test_fail) stencilop = glStencilOp.sfailop;
else if (status == stencil_test_pass & depth_test_fail) stencilop = glStencilOp.dpfailop;
else if (status == stencil_test_pass & depth_test_pass) stencilop = glStencilOp.dppassop;
// stencil test 结束后的操作不需要 mask
stencil_new_value = stencilop(stencilbuf[x,y]);
// 写入 stencil buffer 的时候需要另一个 mask
stencilbuf[x,y] = (stencil_new_value & glStencilMask.mask) | (stencilbuf[x,y] & (~glStencilMask.mask));
混合
\[\begin{equation}\bar{C}_{result} = \bar{\color{green}C}_{source} * \color{green}F_{source} + \bar{\color{red}C}_{destination} * \color{red}F_{destination}\end{equation}\]- \(\bar{\color{green}C}_{source}\):源颜色向量。这是源自纹理的颜色向量。
- \(\bar{\color{red}C}_{destination}\):目标颜色向量。这是当前储存在颜色缓冲中的颜色向量。
- \(\color{green}F_{source}\):源因子值。指定了 alpha 值对源颜色的影响。
- \(\color{red}F_{destination}\):目标因子值。指定了 alpha 值对目标颜色的影响。
glEnable(GL_BLEND);
glBlendFunc(GL_SRC_ALPHA, GL_ONE_MINUS_SRC_ALPHA);
- 关闭深度测试,新的颜色会直接替换掉颜色缓冲区存在的老的颜色。
- 开启深度测试,用深度值来判断,离近裁剪面越近的颜色会替换原有的颜色。
- 开启混合:glEnable(GL_BLEND),会将目标颜色和源颜色按照混合方程式来计算最终的颜色。
面剔除 FaceCulling
glEnable (GL_CULL_FACE); // 开启正背面剔除,默认剔除背面
glDisable(GL_CULL_FACE); // 关闭正背面剔除
// 选择剔除正面还是背面,mode:GL_FRONT(正面)GL_BACK(背面)GL_FRONT_AND_BACK(正背面)
void glCullFace(GLenum mode);
// 设置正面,mode:GL_CW(顺时针)GL_CCW(逆时针)
void glFrontFace(GLenum mode);
帧缓冲 Framebuffers
当创建一个附件的时候,我们有两个选项:
- 纹理
- 渲染缓冲对象(Renderbuffer Object)

前面的简单,后面的慢慢有难度了,基本原理简单,代码是怎么做到的,就是一大坨代码。
unsigned int FBO; // 创建一个帧缓冲对象
glGenFramebuffers(1, &FBO);
glBindFramebuffer(GL_FRAMEBUFFER, FBO); // 开启 glBindFramebuffer

unsigned int texColorBuffer = 0;
glGenTextures(1, &texColorBuffer); // 纹理附件
glBindTexture(GL_TEXTURE_2D, texColorBuffer);
glTexImage2D(GL_TEXTURE_2D, 0, GL_RGB, 600, 450, 0, GL_RGB, GL_UNSIGNED_BYTE, NULL);
glTexParameteri(GL_TEXTURE_2D, GL_TEXTURE_MIN_FILTER, GL_LINEAR);
glTexParameteri(GL_TEXTURE_2D, GL_TEXTURE_MAG_FILTER, GL_LINEAR);

// 它附加到帧缓冲上
glFramebufferTexture2D(GL_FRAMEBUFFER, GL_COLOR_ATTACHMENT0, GL_TEXTURE_2D, texColorBuffer, 0);

unsigned int RBO; // 缓冲对象附件
glGenRenderbuffers(1, &RBO);
glBindRenderbuffer(GL_RENDERBUFFER, RBO);
glRenderbufferStorage(GL_RENDERBUFFER, GL_DEPTH24_STENCIL8, 600, 450);

// 把帧缓冲对象附加上
glFramebufferRenderbuffer(GL_FRAMEBUFFER, GL_DEPTH_STENCIL_ATTACHMENT, GL_RENDERBUFFER, RBO);

if (glCheckFramebufferStatus(GL_FRAMEBUFFER) != GL_FRAMEBUFFER_COMPLETE)
    std::cout << "ERROR::FRAMEBUFFER:: Framebuffer is not complete!" << std::endl;

glBindFramebuffer(GL_FRAMEBUFFER, 0); // 关闭 glBindFramebuffer

// 用这个帧缓纹理创建一个网格 texColorBuffer
Mesh mesh = getMesh(texColorBuffer);

while (!glfwWindowShouldClose(window))
{
    glBindFramebuffer(GL_FRAMEBUFFER, FBO); // 开启 glBindFramebuffer

    // 将内容绘制到自定义帧缓冲的纹理附件
    ... // 一大坨代码

    // 使用纹理绘制窗户
    glBindFramebuffer(GL_FRAMEBUFFER, 0); // 关闭 glBindFramebuffer

    mesh.Draw(caoShader); // mesh 用到的就是上面绘制的帧缓冲
}

glDeleteFramebuffers(1, &FBO);
后期处理核效果
#version 400 core
out vec4 FragColor;
in vec2 TexCoords;
uniform sampler2D texture_diffuse1;

void main()
{
    const float offset = 1.0 / 300.0;
    vec2 offsets[9] = vec2[](
        vec2(-offset,  offset), // 左上
        vec2( 0.0f,    offset), // 正上
        vec2( offset,  offset), // 右上
        vec2(-offset,  0.0f),   // 左
        vec2( 0.0f,    0.0f),   // 中
        vec2( offset,  0.0f),   // 右
        vec2(-offset, -offset), // 左下
        vec2( 0.0f,   -offset), // 正下
        vec2( offset, -offset)  // 右下
    );

    float kernel[9] = float[](
        -1, -1, -1,
        -1,  9, -1,
        -1, -1, -1
    );

    vec3 sampleTex[9];
    for(int i = 0; i < 9; i++)
    {
        sampleTex[i] = vec3(texture(texture_diffuse1, TexCoords.st + offsets[i]));
    }
    vec3 col = vec3(0.0);
    for(int i = 0; i < 9; i++)
        col += sampleTex[i] * kernel[i];

    FragColor=vec4(col,1);
}
天空盒
天空盒是以玩家为中心的,这样不论玩家移动了多远,天空盒都不会变近,让玩家产生周围环境非常大的印象。然而,当前的观察矩阵会旋转、缩放和位移来变换天空盒的所有位置,所以当玩家移动的时候,立方体贴图也会移动!我们希望移除观察矩阵中的位移部分,让移动不会影响天空盒的位置向量。
透视除法是在顶点着色器运行之后执行的,将 gl_Position 的 xyz 坐标除以 w 分量。我们又从深度测试小节中知道,相除结果的 z 分量等于顶点的深度值。使用这些信息,我们可以将输出位置的 z 分量等于它的 w 分量,让 z 分量永远等于 1.0,这样子的话,当透视除法执行之后,z 分量会变为 w / w = 1.0。
天空盒的核心是,模型坐标全部在 -1, 1 上,然后不能有位移,对 view 矩阵进行处理即可:
// 移除任何的位移,但保留旋转变换,让玩家仍然能够环顾场景。
glm::mat4 view = glm::mat4(glm::mat3(camera.GetViewMatrix()));
view = glm::mat4(glm::mat3(camera.GetViewMatrix())); // 去掉位移部分,保持边界刚好覆盖。
glDepthFunc(GL_LEQUAL);
#version 400 core
layout (location=0) in vec3 aPos;
out vec3 TexCoords;
uniform mat4 projection;
uniform mat4 view;
void main()
{
    TexCoords=aPos;
    gl_Position=view*vec4(aPos,1.0);
    float w=-gl_Position.z;
    gl_Position=projection*view*vec4(aPos,1.0);
    gl_Position.z=w; // == gl_Position.w
}

#version 400 core
out vec4 FragColor;
in vec3 TexCoords;
uniform samplerCube skybox;
void main()
{
    FragColor=texture(skybox,TexCoords);
}
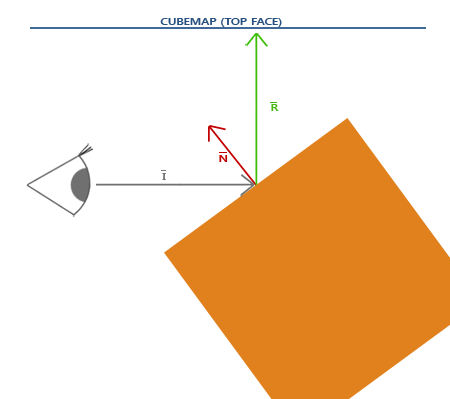
环境映射反射贴图
反射
void main()
{
    Normal = mat3(transpose(inverse(model))) * aNormal;
    Position = vec3(model * vec4(aPos, 1.0));
    // 使用了一个法向量,所以我们将再次使用法线矩阵 (Normal Matrix) 来变换它们。
    gl_Position = projection * view * model * vec4(aPos, 1.0);
}

void main()
{
    vec3 I = normalize(Position - cameraPos);
    vec3 R = reflect(I, normalize(Normal));
    FragColor = vec4(texture(skybox, R).rgb, 1.0);
}
折射
折射是通过斯涅尔定律 (Snell’s Law) 来描述的。
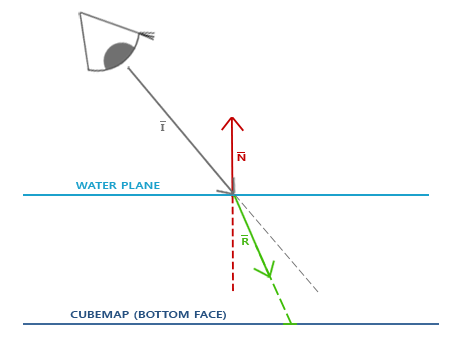
void main()
{
    float ratio = 1.00 / 1.52;
    vec3 I = normalize(Position - cameraPos);
    vec3 R = refract(I, normalize(Normal), ratio);
    FragColor = vec4(texture(skybox, R).rgb, 1.0);
}
高级数据
分批处理顶点属性。我们可以做的是把每种类型的属性的所有向量数据批量保存在一个布局,而不是交叉布局。与交叉布局 123123123123 不同,我们采取批量方式 111122223333。
void glBufferSubData(GLenum target, GLintptr offset, GLsizeiptr size, const void * data);

void glCopyBufferSubData(GLenum readtarget, GLenum writetarget, GLintptr readoffset,
                         GLintptr writeoffset, GLsizeiptr size);
GLfloat positions[] = { ... };
GLfloat normals[] = { ... };
GLfloat tex[] = { ... };
// 填充缓冲
glBufferSubData(GL_ARRAY_BUFFER, 0, sizeof(positions), &positions);
glBufferSubData(GL_ARRAY_BUFFER, sizeof(positions), sizeof(normals), &normals);
glBufferSubData(GL_ARRAY_BUFFER, sizeof(positions) + sizeof(normals), sizeof(tex), &tex);

glVertexAttribPointer(0, 3, GL_FLOAT, GL_FALSE, 3 * sizeof(GLfloat), 0);
glVertexAttribPointer(1, 3, GL_FLOAT, GL_FALSE, 3 * sizeof(GLfloat), (GLvoid*)(sizeof(positions)));
glVertexAttribPointer(2, 2, GL_FLOAT, GL_FALSE, 2 * sizeof(GLfloat), (GLvoid*)(sizeof(positions) + sizeof(normals)));
高级 GLSL
void main()
{
    if (gl_FragCoord.x < 400) // 屏幕坐标
        FragColor = vec4(1.0, 0.0, 0.0, 1.0);
    else
        FragColor = vec4(0.0, 1.0, 0.0, 1.0);

    if (gl_FrontFacing) // 判断正反面
        FragColor = texture(frontTexture, TexCoords);
    else
        FragColor = texture(backTexture, TexCoords);

    // 如果着色器没有写入值到 gl_FragDepth,它会自动取用 gl_FragCoord.z 的值。
    // 我们自己设置深度值有一个很大的缺点,只要我们在片段着色器中对 gl_FragDepth 进行写入,
    // OpenGL 就会禁用所有的提前深度测试 (Early Depth Testing)。
    // 它被禁用的原因是,OpenGL 无法在片段着色器运行之前得知片段将拥有的深度值,
    // 因为片段着色器可能会完全修改这个深度值。
    gl_FragDepth = 0.0; // 这个片段现在的深度值为 0.0
}
接口块 (Interface Block)
#version 330 core
layout (location = 0) in vec3 aPos;
layout (location = 1) in vec2 aTexCoords;

uniform mat4 model;
uniform mat4 view;
uniform mat4 projection;

out VS_OUT
{
    vec2 TexCoords;
} vs_out;

void main()
{
    gl_Position = projection * view * model * vec4(aPos, 1.0);
    vs_out.TexCoords = aTexCoords;
}

#version 330 core
out vec4 FragColor;

in VS_OUT
{
    vec2 TexCoords;
} fs_in;

uniform sampler2D texture;

void main()
{
    FragColor = texture(texture, fs_in.TexCoords);
}
Uniform 缓冲对象
layout (std140) uniform ExampleBlock
{
                     // 基准对齐量      // 对齐偏移量
    float value;     // 4               // 0
    vec3 vector;     // 16              // 16  ( 必须是 16 的倍数,所以 4->16)
    mat4 matrix;     // 16              // 32  ( 列 0)
                     // 16              // 48  ( 列 1)
                     // 16              // 64  ( 列 2)
                     // 16              // 80  ( 列 3)
    float values[3]; // 16              // 96  (values[0])
                     // 16              // 112 (values[1])
                     // 16              // 128 (values[2])
    bool boolean;    // 4               // 144
    int integer;     // 4               // 148
};
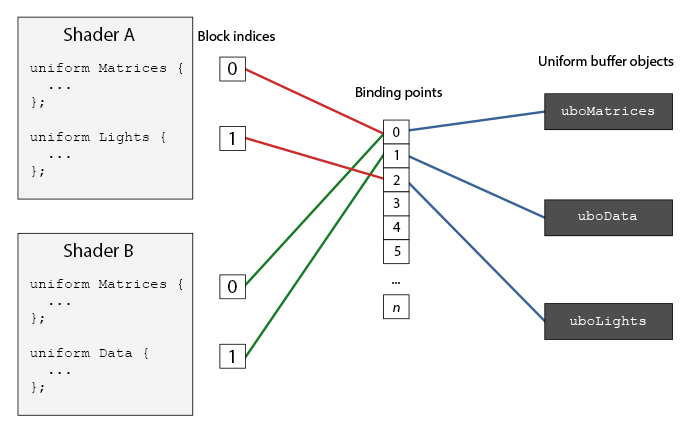
当你达到了 uniform 的最大数量时,你总是可以选择使用 Uniform 缓冲对象。
几何着色器
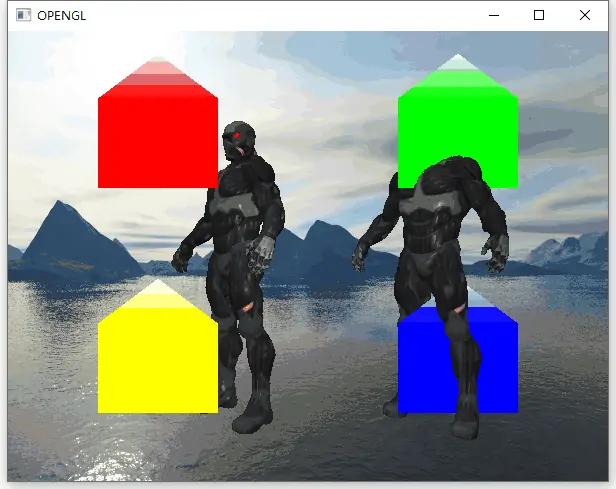
爆破物体
法向量可视化
#version 330 core
layout (triangles) in;
layout (line_strip, max_vertices = 6) out;

in VS_OUT {
    vec3 normal;
} gs_in[];

const float MAGNITUDE = 0.4;

void GenerateLine(int index)
{
    gl_Position = gl_in[index].gl_Position;
    EmitVertex();
    gl_Position = gl_in[index].gl_Position + vec4(gs_in[index].normal, 0.0) * MAGNITUDE;
    EmitVertex();
    EndPrimitive();
}

void main()
{
    GenerateLine(0); // first vertex normal
    GenerateLine(1); // second vertex normal
    GenerateLine(2); // third vertex normal
}

实例化 (Instancing)
glDrawArraysInstanced & gl_InstanceID
小行星带
抗锯齿 MSAA、离屏 MSAA
// configure second post-processing framebuffer
unsigned int intermediateFBO;
glGenFramebuffers(1, &intermediateFBO);
glBindFramebuffer(GL_FRAMEBUFFER, intermediateFBO);

// 2. now blit multisampled buffer(s) to normal colorbuffer of intermediate FBO. Image is stored in screenTexture
glBindFramebuffer(GL_READ_FRAMEBUFFER, framebuffer);
glBindFramebuffer(GL_DRAW_FRAMEBUFFER, intermediateFBO);
glBlitFramebuffer(0, 0, SCR_WIDTH, SCR_HEIGHT, 0, 0, SCR_WIDTH, SCR_HEIGHT, GL_COLOR_BUFFER_BIT, GL_NEAREST);
多重采样纹理附件
glBindTexture(GL_TEXTURE_2D_MULTISAMPLE, tex);
glTexImage2DMultisample(GL_TEXTURE_2D_MULTISAMPLE, samples, GL_RGB, width, height, GL_TRUE);
glBindTexture(GL_TEXTURE_2D_MULTISAMPLE, 0);

glFramebufferTexture2D(GL_FRAMEBUFFER, GL_COLOR_ATTACHMENT0, GL_TEXTURE_2D_MULTISAMPLE, tex, 0);

glRenderbufferStorageMultisample(GL_RENDERBUFFER, 4, GL_DEPTH24_STENCIL8, width, height);
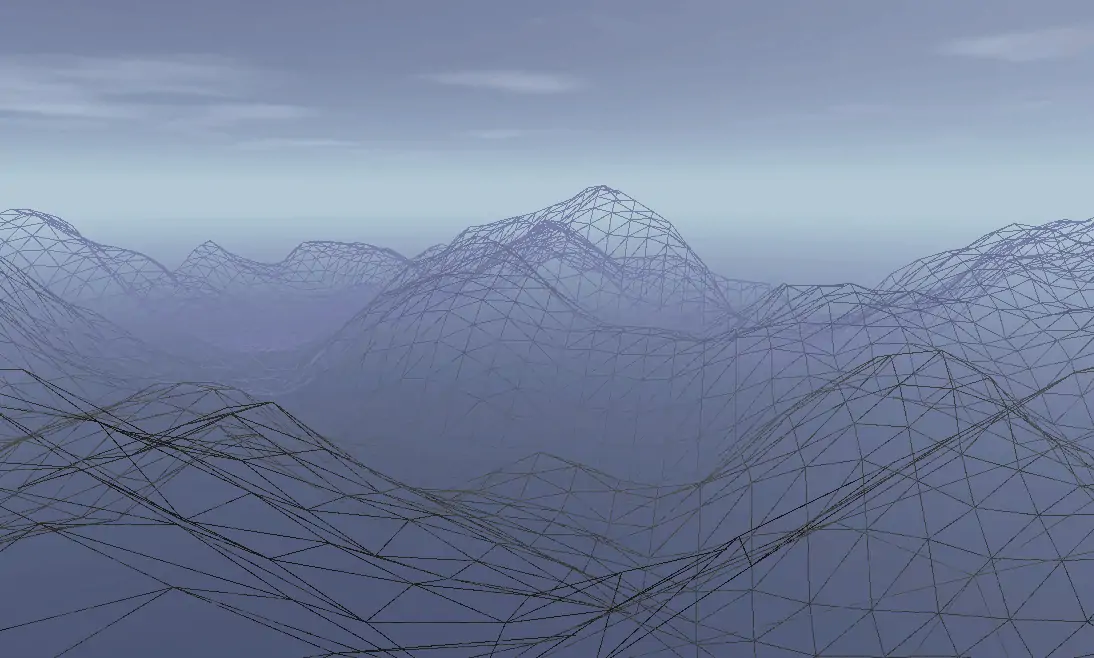
Vulkan 动态地形细分 (Tessellation Shader)
参考资料
参考资料快照
- https://antongerdelan.net/opengl/raycasting.html
- https://zhuanlan.zhihu.com/p/115230970
- https://blog.csdn.net/korekara88730/article/details/42213217
- https://mp.weixin.qq.com/s/l5eYzkYAzR-m21-iYBoyCw
- https://riptutorial.com/zh-CN/opengl/example/23675/%E5%B8%A7%E7%BC%93%E5%86%B2%E7%9A%84%E5%9F%BA%E7%A1%80%E7%9F%A5%E8%AF%86
- https://blog.csdn.net/qq_35312463/article/details/107283286
- http://www.songho.ca/opengl/gl_projectionmatrix.html
- 图形学笔记 -- OpenGL 图形学 / 视差贴图(Parallax Mapping) | 07 Jan 2021
- 图形学笔记 -- OpenGL 图形学 / 高级光照 阴影 shadowMapping | 24 Dec 2020
- 图形学笔记 -- LearnOpenGL CN 学习笔记(原书复习) | 21 Dec 2020
- 图形学笔记 -- OpenGL 图形学 / 高级 OpenGL:Stencil Test(模板测试) | 16 Dec 2020
- 图形学笔记 -- OpenGL 图形学 / 高级 OpenGL:深度测试、面剔除、帧缓冲 等 | 15 Dec 2020
- 图形学笔记 -- OpenGL 图形学 / 高级光照 Blinn-Phong & 阴影 | 14 Dec 2020
- 图形学笔记 -- OpenGL 图形学 / 模型加载 | 11 Dec 2020
- 图形学笔记 -- OpenGL 图形学 / 坐标系统 | 11 Dec 2020
- 图形学笔记 -- OpenGL 图形学 / 冯氏光照模型 | 09 Dec 2020
- 图形学笔记 -- 计算机图形学 OPENGL 入门 | 11 Nov 2020
 .
.